개발자
류준열
Module Federation을 이용한 Micro frontend 예제 만들어보기
만들어둔 예제는 내 깃허브에 올려두었는데 사실 vite 레포지토리의 재생산이다.
Micro Frontend
Micro Fronted는 여러개의 프론트엔드 제품들이 합쳐져 하나의 어플리케이션을 구성하는 것이다.
예를들어 네이버는 다음과 같이 iframe을 통해 naver.com과 독립된 '쇼핑제품'을 넣어두었다.


이렇게 하면 작은단위의 프론트엔드 제품들의 빌드, 배포 시간을 단축하고 각 제품들이 독립되어 있기 때문에 한 제품의 업데이트가 다른 제품에 사이드이펙트를 일으키지 않도록 할 수 있다.
우리 회사는 IT 자산 솔루션을 운영하고 있는데, 라이센스별로 부여되는 기능모듈들의 관리를 용이하게 하기 위해 MFA를 도입하기로 결정했다.
위 네이버의 방식은 iframe을 이용한 방식이다. 그런데 가장 대중적으로 사용되는 방식은 런타임에 통합되는 Module Federation 방식이라고 한다.
Module Federation
Module Federation(=모듈 연합)은 다른 빌드들에서 만들어진 모듈들을 하나의 Container앱에서 사용 할 수 있게 하는 방식이다. (Module Federation을 한국어로 잘 설명해준 글)
A모듈, B모듈,... 여러 모듈들이 하나의 Container 앱에 통합되어 하나의 어플리케이션을 이루게 된다.
이 Velog 글을 보고 따라했는데 원본 코드는 이 Github에 있다. 지금부터 쓰는 글은 어찌보면 이 글의 재생산이기도 하지만 나의 경험을 정리하기 위해 작성하기로 했다.
간단한 Micro Frontend 프로젝트 세팅
pnpm, vite, react, typescript로 만들었다.
프로젝트 폴더를 만들고 프로젝트 하위에 두개의 폴더를 만든다. 이 두개의 폴더는 각 모듈이 된다. 나는 host, remote 두개의 폴더를 생성했다.
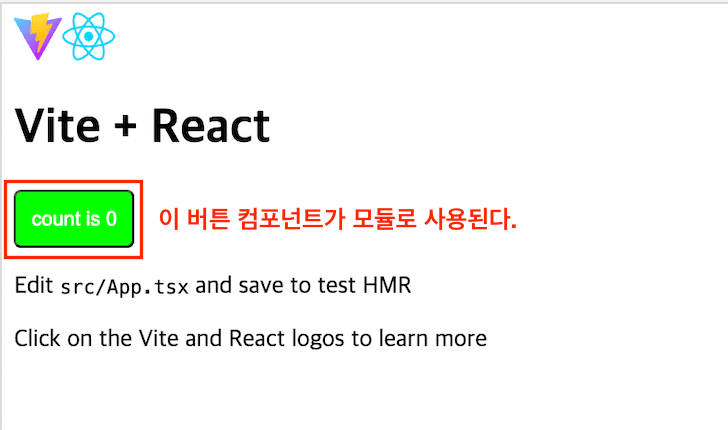
위 예제는 host라는 어플리케이션에서 remote라는 버튼 모듈을 사용하는 상황이다.
각 폴더에서 다음 명령어를 입력해준다.
// host, remote 에서 아래 입력어를 입력

pnpm create vite . --template react-ts
pnpm install -D @originjs/vite-plugin-federation
이렇게 하면 remote와 host에 vite react-ts 프로젝트가 생성된다.
remote 버튼 모듈
Button.tsx
일단 remote에서 간단한 Button을 만들었다.
(난 scss가 편해서 remote앱에 pnpm add -D sass 도 추가했다.)
// remote/src/components/Button/index.tsx

import styles from "./index.module.scss";

export interface ButtonProps
  extends React.DetailedHTMLProps<
    React.ButtonHTMLAttributes<HTMLButtonElement>,
    HTMLButtonElement
  > {}

export const Button = ({ children, ...props }: ButtonProps) => {
  return (
    <button className={styles.button} {...props}>
      {children}
    </button>
  );
};
vite.config.ts
remote의 버튼 모듈을 만들었으니 버튼 모듈 빌드 결과물을 다른 프로젝트에서 모듈로써 사용할 수 있게 vite.config.ts를 설정해주어야 한다.
remote 프로젝트의 vite.config.ts는 다음과 같다.
import { defineConfig } from "vite";
import react from "@vitejs/plugin-react";
import federation from "@originjs/vite-plugin-federation";

// https://vitejs.dev/config/
export default defineConfig({
  plugins: [
    react(),
    federation({
      name: "remote-app",
      filename: "remoteEntry.js",
      // Modules to expose
      exposes: {
        "./Button": "./src/components/Button",
      },
      shared: ["react", "react-dom"],
    }),
  ],
  build: {
    modulePreload: false,
    target: "esnext",
    minify: false,
    cssCodeSplit: false,
  },
});
federation 속성의 의미는 다음과 같다.
- filename: federation의 내용을 담을 파일의 이름, remoteEntry.js
- expose: 우리가 모듈로써 내보낼 Button 컴포넌트와 그 경로를 정의
- shared: 의존성, 여기서는 react와 react-dom
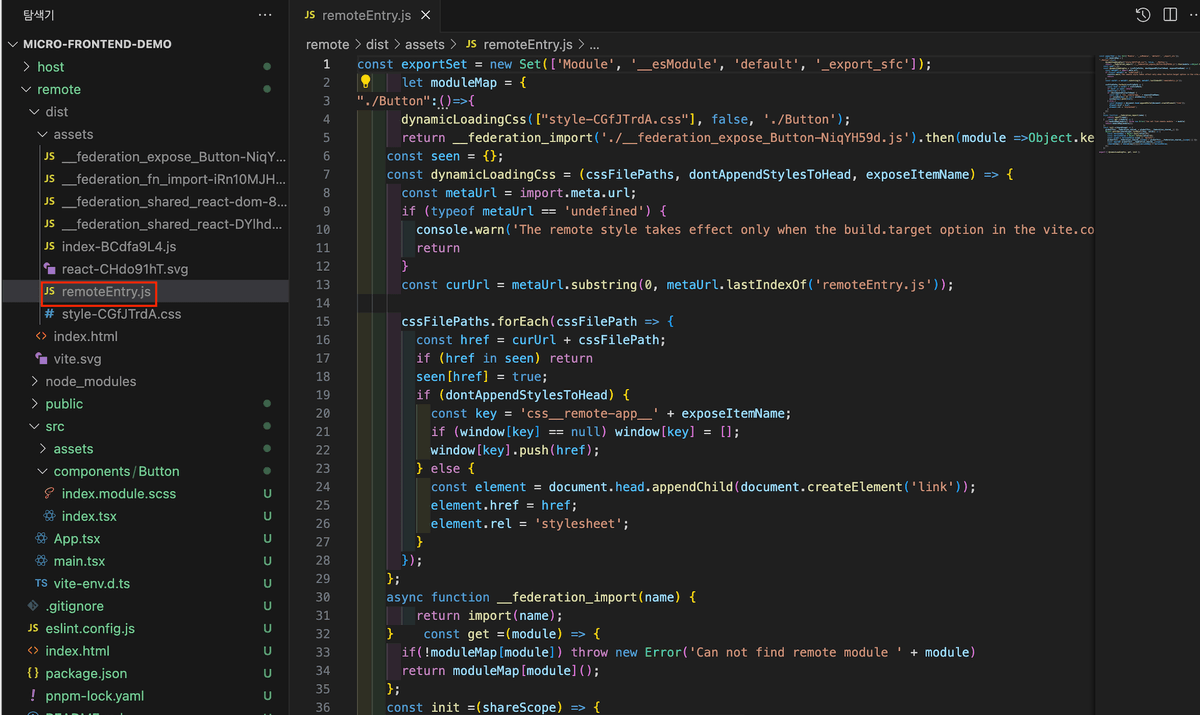
remoteEntry.js
그리고 package.json을 조금 바꿔주었다.
// remote의 package.json

...
"scripts": {
    "dev": "vite --port 5001",
    "deploy:dev": "pnpm build && pnpm run preview",
    "build": "vite build",
    "preview": "vite preview --port 5001"
  },
...
빌드하면 vite.config.ts의 federation속성에 설정했던 내용대로 remoteEntry.js가 생성된 것을 확인할 수 있다.
이제 pnpm run deploy:dev를 실행해두고 host로 넘어가자.
host 컨테이너 앱
vite.config.ts
remote 앱의 버튼 모듈을 사용하기 위해 host의 vite.config.ts를 수정해준다.
import { defineConfig } from "vite";
import react from "@vitejs/plugin-react";
import federation from "@originjs/vite-plugin-federation";

// https://vitejs.dev/config/
export default defineConfig({
  plugins: [
    react(),
    federation({
      name: "host-app",
      remotes: {
        remoteApp: "http://localhost:5001/assets/remoteEntry.js",
      },
      shared: ["react", "react-dom"],
    }),
  ],
  build: {
    modulePreload: false,
    target: "esnext",
    minify: false,
    cssCodeSplit: false,
  },
});
federation 속성의 의미는 다음과 같다.
- remotes: 가져다 쓸 모듈의 이름과 경로를 정의, import 할때 remoteApp이라는 이름을 사용하게 된다.
- shared: 의존성, 중복되는 react와 react-dom는 다운로드 받지 않는다.
remote 버튼 모듈 가져다 쓰기
remote 프로젝트에서 pnpm run deploy:dev를 입력해두었다면 build 결과물이 localhost:5001에서 실행되고 있을 것이다.
브라우저 주소창에 http://localhost:5001/assets/remoteEntry.js를 입력했을때 아래와 같이 나타나면 정상이다.

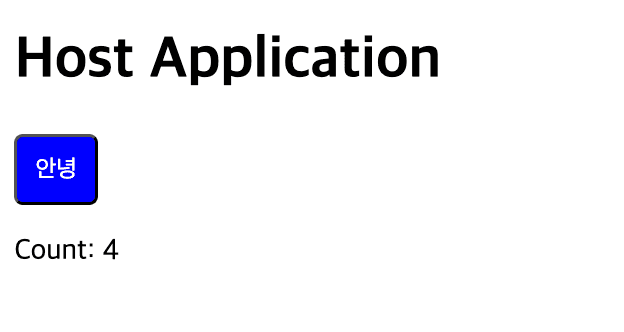
remote 앱의 빌드 결과물이 localhost:5001에 띄어져 있는게 확인되었으면 host 앱의 App.tsx에 다음과 같이 Button을 import해 준다.
// host/src/App.tsx

import { useState } from "react";
// remoteApp 은 host의 vite.config.ts에 명시해준 이름이다.
import { Button } from "remoteApp/Button";

function App() {
  const [count, setCount] = useState(0);

  return (
    <>
      <h1>Host Application</h1>
      <Button onClick={() => setCount((count) => count + 1)}>안녕</Button>
      <p>Count: {count}</p>
    </>
  );
}

export default App;
난 import { Button } from "remoteApp/Button";에서 type에러가 떠서 임시로 아래 declarations.d.ts를 추가해주었다.
// src/declarations.d.ts
declare module 'remoteApp/Button' {
  import { ButtonProps } from 'react';
  const Button: React.FC<ButtonProps>;
  export { Button };
}
이제 다음과 같이 remote앱의 버튼모듈을 host앱에서 공유하는 것을 확인할 수 있다!
런타임에 통합되는 Module Federation
런타임이 통합된다는 것은 remote앱을 업데이트 하면 host 앱을 따로 빌드하지 않아도 host 앱에 remote앱의 업데이트 사항이 반영된다는 것이다.
remote 버튼 스타일 변경
한번 remote 버튼 모듈의 스타일을 변경해보자. 나는 border-radius를 둥글게 바꿔보았다.
// remote 앱의 Button/index.module.scss

.button {
  background-color: blue;
  color: #fff;
  padding: 10px;
  border-radius: 5px;
  cursor: pointer;
  transition: background-color 0.3s;
	// 추가
  border-radius: 50%;
	//
  &:hover {
    background-color: #0f0;
  }
}
스타일을 변경하고 다시 pnpm run deploy:dev를 입력하여 Button.tsx가 변경된것을 확인한다.
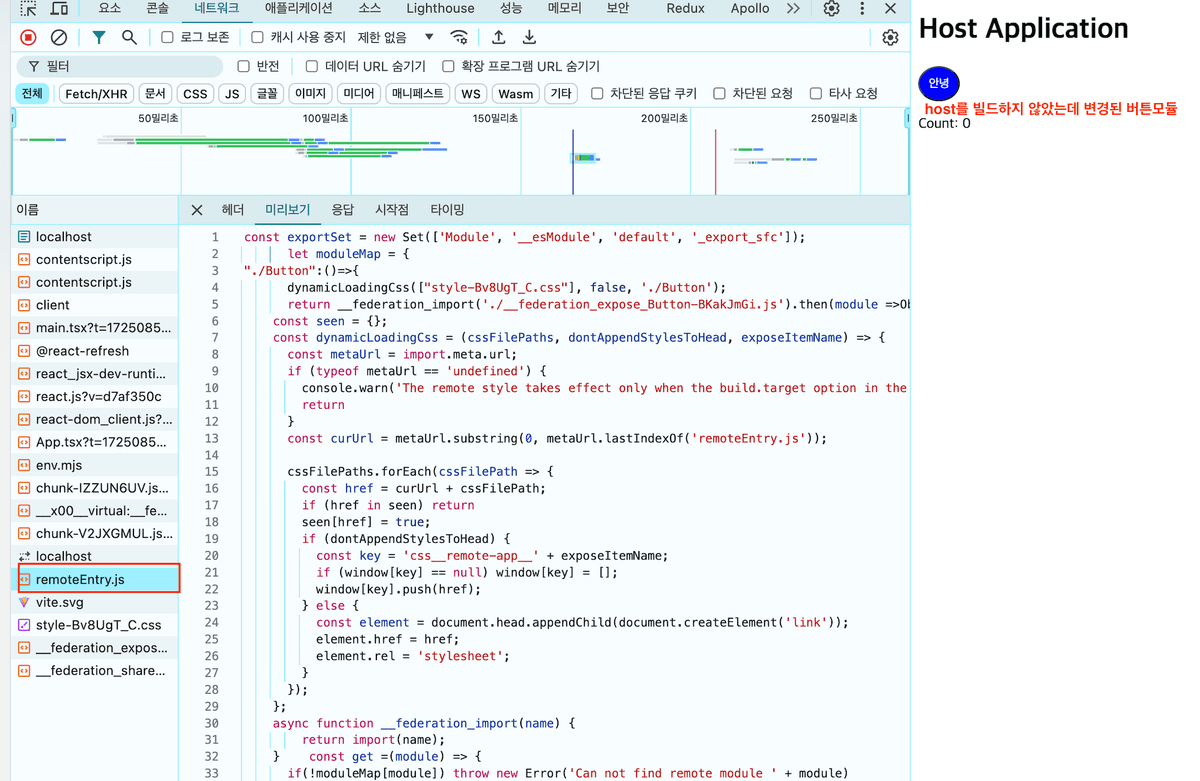
Host 앱 새로고침
host 앱에서 네트워크 탭을 켜놓고 새로고침을 하면 다음과 같이 버튼 모듈이 업데이트 되는 것을 확인할 수 있다.
느낀점
이렇게 빌드없이 런타임에서 다른 빌드의 결과물을 이용할 수 있는 것을 확인해보았다!
위 예제를 실습해보면서 Module Federation의 원리를 이해할 수 있었고, 어쩌면 지금껏 사용해오던 카카오맵도 Micro frontend구나 하는 생각이 들었다. Script를 통해 런타임와중에 불러오니깐
대규모 프론트엔드를 안정적으로 관리하는 기술에 능숙해져 있을 미래의 나를 상상할 수 있었다.